Checkers Strategy
Tactics and winning ideas for improving players · Updated August 9, 2026
Checkers looks simple, but strong play is built on a few powerful ideas: winning the exchange war, controlling the centre, guarding your back row, racing for the first king, and setting the little traps that win a piece. This guide covers each with diagrams. New to the game? Start with the how-to-play guide or the rules, then come back — and play free on Checkers Arena to practise.
Think in trades
Almost every checkers plan comes down to the exchange war. Each turn you are asking: does this move win material, lose it, or trade evenly — and does the trade help me? The guiding rule is simple:
- When you are ahead in pieces, trade. Every even swap brings your material lead closer to a win, because your extra piece matters more as the board empties.
- When you are behind, avoid trades. Keep pieces on the board and play for a trap, a shot, or a drawn fortress instead.
Forcing exchanges
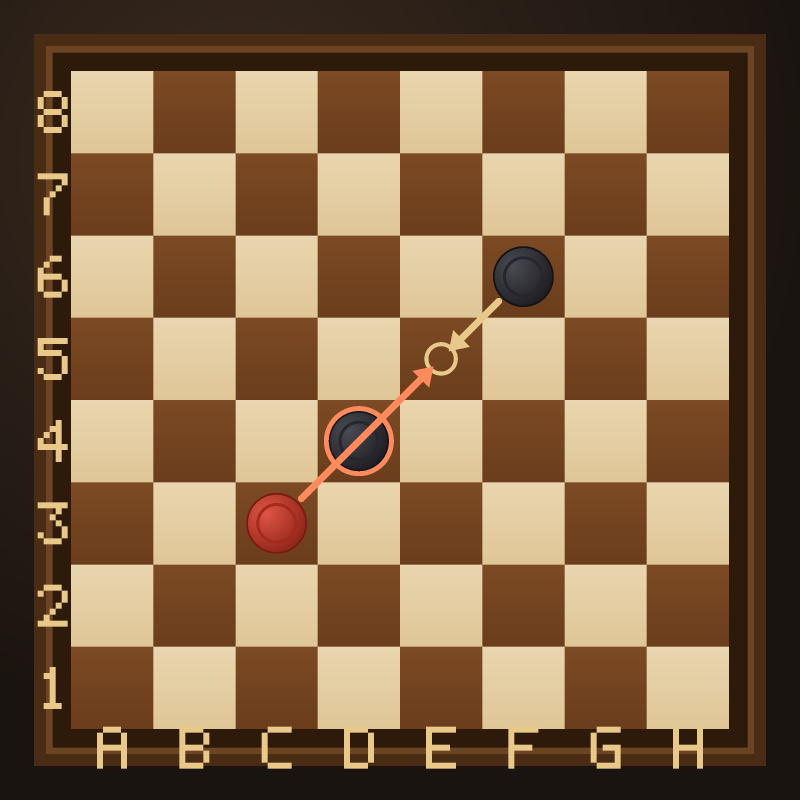
Because captures are compulsory, you can often force a trade whenever it suits you. Move a piece where the opponent must jump it, and be ready to recapture. Below, Red plays c3×d4 to e5; the black man on f6 is then forced to recapture on e5 — a clean even trade that Red was happy to make because Red is ahead.
Control the centre
Pieces in the middle of the board reach more squares and support more captures than pieces stuck on the edges. Aim to occupy and fight for the central squares; a piece pushed to the side rail has half the mobility and is easier to shut out of the game. Don't rush every piece forward, though — advance with support so a lone man is never left to be picked off.
Guard your back row
The four pieces on your own back row (the king row) do two jobs: they stop the opponent from crowning a king there, and they anchor your defence. Give them up slowly and only for good reason. A common plan is to hold the two "bridge" squares as long as possible, releasing the others as the position demands. Break the whole back row too early and you hand your opponent an easy king.
Race for the first king
A king moves and captures in every direction, so the first king is often a real advantage — it can chase down men that can only move forward. When a lane opens toward the far row, pushing a man through to be crowned is frequently worth more than grabbing a piece elsewhere. Just make sure the run is safe: a man that walks into a forced trade on the way gains you nothing.
The double corner
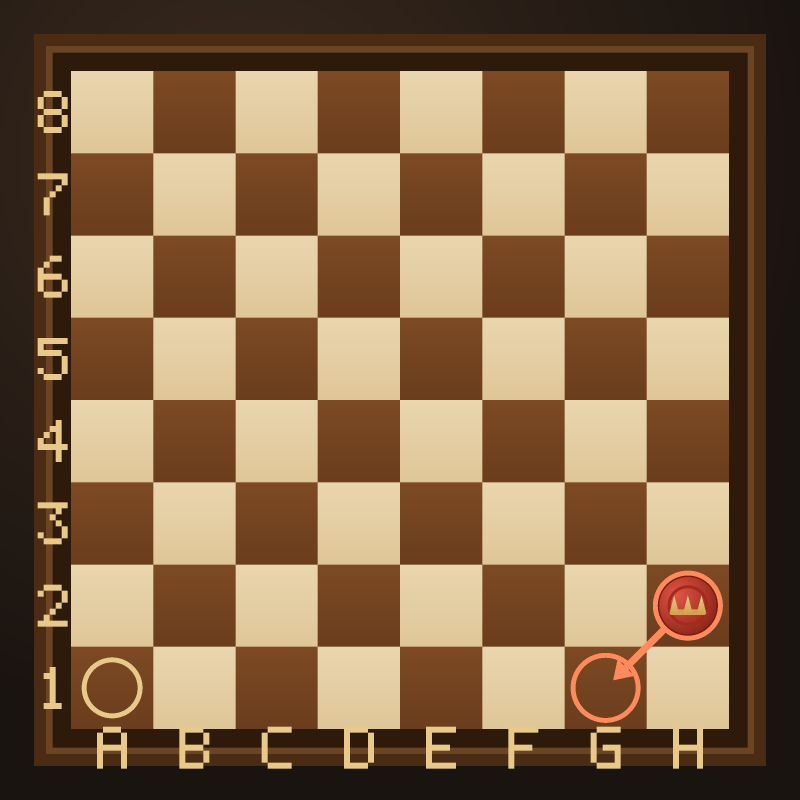
Each player has a double corner on their right — two dark squares tucked into the corner (for Red, g1 and h2). A piece there can shuffle between two squares, which makes it very hard to trap. The single corner (a1 for Red) has only one square and far less room.
The 2-for-1 shot
The prettiest way to win a piece is a shot: you give up one man so that the opponent's forced capture lines their pieces up, then a single move jumps two of them. Net gain: one piece — often enough to win the game. Shots hide in ordinary-looking positions, so before you move, always ask: "if I sacrifice here, does a double jump come next?" And ask it for your opponent too — the same trap can be set against you.
Reading about a shot is one thing; watching the engine spring one is another. Open this position in the checkers solver — red to play, four legal moves, and only one of them wins material. Press Analyse and it will show you the sacrifice and the double jump that follows it.
Trapping kings
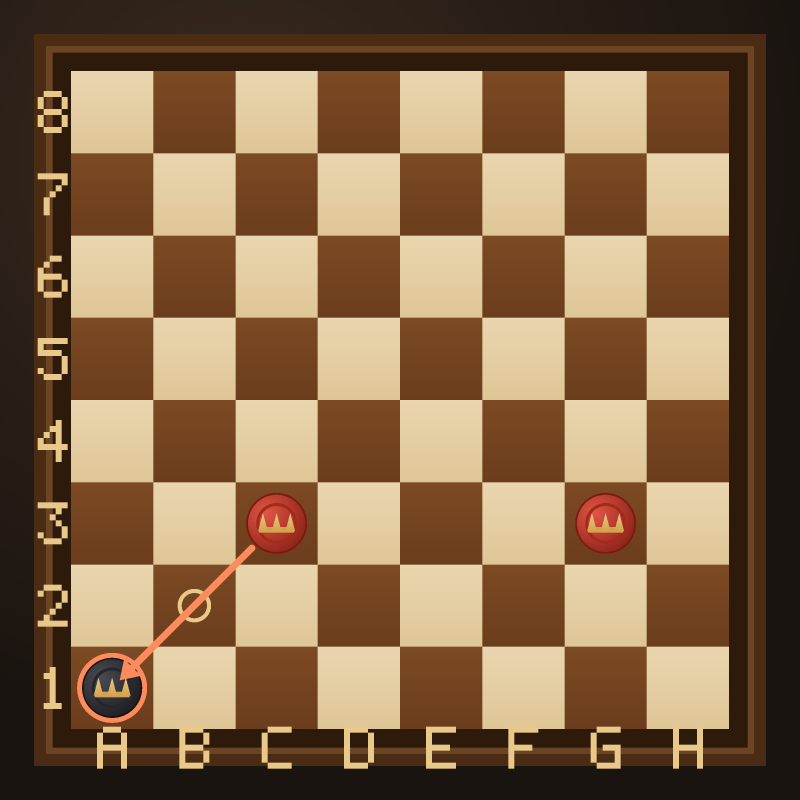
A king is powerful, but not untouchable. Against the edge — and especially in the single corner — even a king can be trapped. In the position below Black's king on a1 has just one move, to b2, but Red's king on c3 guards that square: it would jump the king and land on a1. With a spare king to pass the move, Black is in zugzwang — any move loses.
Endgame: turning a piece up into a win
- Simplify. A piece ahead, keep trading until only a few pieces remain — your extra man decides the game.
- Push the opponent to the edge. Use your kings to herd the enemy's last pieces toward a rail or the single corner, where they run out of squares.
- Two kings beat one away from the double corner. Coordinate them to attack a square the lone king must cross.
- Defending? Reach your double corner and shuffle — many "losing" endings are actually drawn once the weaker side gets there.
Those last two are rules of thumb, and they are the two you no longer have to take on trust. Our checkers endgame database holds every position with four pieces or fewer — 6.4 million of them — solved exactly, so the advice becomes a lookup. It also shows how careful the wording has to be. With two kings against one and the stronger side to move, 14,846 of the 14,880 possible placements are won and 34 are drawn: the rule holds, but not without exceptions, and the hardest of those wins takes 17 moves to finish. King against king is drawn in about two thirds of placements; in the rest one king is simply caught out of position, and those are over within six moves. Below four pieces there is nothing left to estimate.
Common strategic mistakes
- Trading while behind. Swaps help the player who is ahead — if you are down a piece, keep the board full and look for a shot.
- Breaking the back row early, handing the opponent a free king.
- Drifting to the edges, where pieces have half the mobility and get shut out.
- Grabbing a "free" piece that turns out to be the bait in a 2-for-1 shot.
- Rushing a lone man forward into a forced trade instead of advancing with support.
Quick strategy checklist
- Count material every move. Ahead? Trade. Behind? Don't.
- Fight for the centre; keep pieces supported, not stranded on the edge.
- Hold your back row to deny the opponent an easy king.
- Race for the first king when the lane is safe.
- Before moving, look for a 2-for-1 shot — yours and your opponent's.
- Defending a lost-looking ending? Head for the double corner.
Put it into practice
Strategy sticks when you play. On Checkers Arena the board highlights every legal move and enforces forced captures, so you can focus on the plan — trade when ahead, set your shots, and trap the enemy king. Play the computer on three levels, or friends and online opponents, free with no signup.
▶ Play checkers nowMore: the step-by-step how-to-play guide, the complete checkers rules, and the best opening moves.
Want to write a position down or share a puzzle? The Checkers Diagram Maker builds any board by clicking and exports it as PNG or SVG.
← Back to the game